Monday, 30 November 2009

sue ryder upcycle


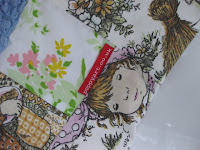
like many others, i was inspired to whip something up for the sue ryder competition on folksy. it is a really nice way to do something creative for charity. i have made a small floor quilt. it would be brilliant for babies with its lovely patterns and textures.


i started with a pair of holly hobby curtains, and added a mix of upcycled floral sheets, some of the fab candlewick bedspread (which is still going!) and and embroidered tray cloth. the holly hobby print reminds me of my creative aunt who gave my sister and i pretty cushions with that image one year for christmas. and i had to choose patchwork as it was katy with her charm quilt swap which really inspired my crafting. http://sycamorestirrings.blogspot.com/.
i cut all my squares and laid them down on a couple of large pieces of iron-on interfacing. once ironed down, i stitched them together down the columns and then across the rows. the process was explained somewhere in cyberland, but i'm afraid i can't find it!


anyway, i finished the quilt with an upcycled sheet and wide binding of holly hobby fabric. i toyed with the idea of tieing the squares with japanese-style knots but decided against it in case some came loose and were swallowed by before mentioned baby!

i am really please with the finished product. i have taken extra care with my sewing and believe the fabric combination to be really beautiful.

the quilt is listed here http://www.folksy.com/items/132418--hobby-floor-quilt . the auction starts in the next week and you can buy it (and vote for it!) soon. all proceeds to the sue ryder cancer charity.

Thursday, 26 November 2009

new show REVEAL SHOWCASE


I am very excited about being part of the Reveal Showcase, Henley-on-Thames. I am joining some top quality craftspersons for what looks to be a really inspiring exhibition. I am there 10th December - 13 th December. Well my goods will be, anyway. I am manning the counter on Saturday 12 -2pm. Come along and say hello. If you can't make it that day, there will be great stuff for the whole weekend, plus the weekend before. Have a look at these lovelies..


Monday, 23 November 2009

lavender whale wheatbag


number 3 in the 12 days of christmas craft tutorials - here is a lavender wheatbag. i have chosen a whale as it is a very simple outline. just right for children and adults to snuggle up in bed or on the couch, and a perfect gift. it needs around 1 1/2 mins in the microwave and the grains of wheat will hold their warmth for at least half an hour. i'd recommend putting a small dish of water in the microwave along with the bag after about 1 month's use... it refreshes the wheat a bit. if you are making it for a baby or a very small child, just use it as pre-sleep bed warmer.

1. source your wheat and lavender. i found a great big sack at a local livestock supply place (they sell feed and large quantities of dog food and riding gear... try the yellow pages) lavender is easily available online or probably from your local market.

2. choose a simple outline approx 25cm in diameter... a whale, a hedgehog, bunny, a penguin, a heart. cut out your front fabric and your backing fabric. i was lucky enough to find a new cotton candlewick bedspread in a charity shop a while ago. it has made the most fantastic tactile backing for many wheatbags. i have used natural fibres...mostly cotton and some lovely wool.


3. sew any details onto the front fabric. i chose a large black corduroy eye for my animals for a bit of continuity. the bunny needed a fluffy tail and the penguin, a wing.


4. join the front and back together, with a generous seam allowance. i find it easiest and neatest to sew all the way around and then unpick a gap for turning the right way and then filling. CLIP any sharp angles or turns. i.e. the whale's tail needs a careful clip into the gap.


5. turn the right side around and fill with a mixture of lavender and wheat. i use about 3 tablespoons of dried lavender tips to 3 cups of wheat. you don't want the bag to be too firm, so leave enough space for a bit of squishing about.

6. finish by sewing up the gap with small neat stitches - you don't want the wheat escaping.

here are some of my finished bags - i sell them at craft fairs.


use the shapes to help with any gifts you make, BUT don't copy them if you are going to sell wheat bags yourself. it is not a new concept, so i am happy for you to take this as a starting point for selling, but use different designs, please. you could look in children's books for simple shapes. does this make sense? send me a message if you are confused or want to ask permission!

pitta pizza

this is an old favourite with the boys... but it has been recently forgotton.

wholemeal pitta bread, tomato puree and then pizza toppings. i toasted the pitta a little before throwing on the ham, mushrooms and cheese but they would have probably been just as happy without that step.
and i had anchovies and sliced tomatoes on mine. yum.
sorry about the side-on photo!

Saturday, 21 November 2009

granny is back!


my mum has returned from her jaunt around a little bit of europe. she and her husband john loved staying in montmatre and adored marseille. and she bought me this little bag of french sewing goodies... along with other treats.


i met up with her and my brother in london yesterday. we were treated to the most enormous steak and mushroom pie at the very traditional guinea grill http://www.theguinea.co.uk/. freddie joined his dad for a mountain of sushi and then we hopped across to pilmico to the tate gallery. a few majestic canvases to compare, a bit of modern art (current turner prize shortlisters at the moment) and then home.

Thursday, 19 November 2009

bought on folksy tonight

the knitted oast house is from http://www.folksy.com/shops/NiftyKnits. you can also buy way- cool knitted meerkats. hubby is getting the sweet house for christmas... the lucky dog!
and this necklace if a present for me, to wear over the festive season. brilliant! from here http://www.folksy.com/shops/ichbin. very trendy stuff here.

feeling a bit rash and made these 2 little purchases on folksy. they are lovely original things, and wonderful value for money. check out the site, you won't be disappointed. these 2 items were around the £6 mark, including postage.

i also discovered this shop there today, wow!


i have done some embroidery, the donkey and turtle aprons sit in my shop still. but i do love the look of glass mountain's things. another favourite artist who paints with cottons is tiny happy, just click on the link on the left of my site.

spicy apple


new in the folksy shop, and all ready for the stall tables over christmas... i've made a pile of spicy apples. they have crushed cinnamon sticks and cloves secreted inside the filling so give off a delicious scent. very christmassy! i think they would make a perfect teacher gift.

Tuesday, 17 November 2009

centrparcs


this is a magic place for families. the boys rode their bikes, sped on the scooters, shot down the waterslides. while we were there, harry had turns on his new (borrowed) bike, freddie learnt to start by himself without stabilisers and i rode my first bike in years.

and we shared the time with good friends. you can't really go wrong.

the pictures of me and keith were taken by freddie.

whoo hoo!

i do love folksy but i haven't had many sales...it just goes to show i need to keep posting new items up to keep the browsers interested. two in two days! yay!

and added the brooches (2 of which went immediately) and super hero capes today. as well as some funky christmas stockings.


so along with last week's Ladies Night at Wheathampstead, a couple of orders for friends (half-apron pictured) shock horror! actually taking in some money this week.


right. off to sew up a storm. again.


mini 'needles and pins'


Just back from Centreparks last night and thought you would be ready for a super-easy and practical gift to make. Well I think it would be a handy stocking filler, anyway. If you want to keep just a couple of sewing bits handy - in the kitchen drawer maybe - this is the thing. And for me, a chance to use some lovely Japanese prints because their small scale can be highlighted. Finally - that gorgeous bambi is centre stage!
This is my mini 'needles and pins'.
step 1
Choose your fabric and cut rectangles of 8cm X 14cms from your feature fabric, stiffening and lining fabric. Also cut 1 piece of felt 5cm X 7 1/2cm.
step 2
Centre your felt piece on top of your lining fabric and stiffening fabric. Pin and then sew a straight stitch down the middle. Do try and line it up properly as the item is so small, any wonkiness is noticable... (yep I did unpick a couple, and I even used a pale stripe for my lining!)
step 3
Place your feature fabric on top of the layers you've joined together, face down. Stitch all the way around the edge with a narrow seam. I find it neat and easy to do this and then go back and unpick a small space to turn it the right way. If you prefer, leave a small gap for turning.
step 4
Clip corners before you turn to keep them sharp.
step 5
Once your case is the right way around, use a chopstick or similar to poke out the corners into sharp edges, and close the space with tiny stitches. Give it a firm iron. Watch out for the content of your felt as it can melt - wool is best! Or iron face down.
step 6
Add 3 needles, a few pins and different sized safety pins as well. You could alway include some mini cotton reels with your gift.
I have these on my stall, although at there first outing last Thursday, they weren't a big hit! I will keep you posted if this changes...
I first saw some mini needlecases like this, termed 'housewifes' on the the beautiful tiny happy blog. Click onto the link on the left to have a look.

Tuesday, 10 November 2009

folksy joy!


If you want to have a great, handmade choice of wonders for Christmas presents... and you don't get a chance to make all of my 12 Days of Christmas Crafts!... you need look no further than http://www.folksy.com/ .


Here is today's 2 top picks...

1. Nant designs hand-printed cards, £12.50 for 5
2. Hand thrown pot Julia Smith Ceramics £9

Friday, 6 November 2009

beautiful scrappy yo yo brooch


This is the first of twelve Christmas gift tutorials... plenty to keep you (and me) busy then!
I have a whole array of brooches for sale. They are perfect to use up spare fabric and give me a chance to mix up things a bit. I tend to do batches... some are quite manic fabric combos, some more sober. I think most ladies would love the treat of a new brooch to wear on their winter coat.

step 1
Assemble materials. I have used:

  • -lovely scrap of japanese fabric
    -green felt already cut into the shape of leaf
  • -vintage button
  • -brooch back or safety pin (I found my brooch backs on ebay)
  • -tape measure printed fabric strip or ribbon or braid


step 2


You need a small circle of felt for the back of the brooch and a large circle of your fabric for the yo yo. Use appropriate templates. I've used a small tea-cup plate (that doesn't sound right... oh, I mean a saucer!) plus a large cotton reel. And cut out your circles.


step 3
Start your yo yo. These are fun to make. Using your large fabric cirlcle, just fold over a narrow hem with your finger and sew a neat running stitch as you go. Use at least a double thread as it needs to have enough strength to be gathered up at the end.

Pull your thread carefully and firmly so it gathers and makes an even circle. Ideally, I would have ironed the yo yo flat at this stage, but it was all done at a Market. No irons available...


step 4
Sew a loop of ribbon or braid to the 'top' of the yo yo. I had a strip of fabric so used that. You can also see my felt leaf, chosen suede button and an extra circle of linen ready to be layered.


step 5

After layering the elements, sew through to the back a couple of times and flip everything over. You are going to attach the felt with a neat running stitch around the outside of the circle. Then attach the brooch back to the felt. (If using a safety pin, I'd recommend a little rectangle of felt to hold the pin onto the circle).

step 6

Admire the finished brooch. Check which scraps you have left to make more.

And try the same ideas with hair elastics... great stocking fillers!

12 Days of Christmas Gifts


I would love to increase the trickle of traffic through my blog, so would like to encourage as many users as possible to pop by. And hopefully say hello! I had a think and for me, a tutorial would be great encouragement. Oh, and a giveaway. So firstly... twelve, yes twelve, Christmas craft tutorials. Perhaps you could make something for your family?

The first I will also post onto http://folksy.com/ for that lovely community to make use of as well.

Starting off, will be a beautiful scrappy yo yo brooch. Please let me know how you go.

Tuesday, 3 November 2009

halloween

This is Harry being a scary monster, clutching his ghosty lollipop. I found the idea here http://sycamorestirrings.blogspot.com/2009/10/lollipop-ghosts.html


Okay, I didn't get a chance for too many photos... but we had a brilliant time. 20 children plus parents in the house, lots of food and mulled wine. Then a quick walk throught the underpass and the spooky church and 2 doors to knock on for Trick or Treating.


Everyone bought stuff along, the kids successfully sat down to eat on the lounge floor and we were all happy! Thanks to everyone for the food and bits and expecially Dawn for the fantastic soup and help clearing at the end.


It was a great fun evening, and not spoilt by the muppets who lobbed an egg at our group of toddlers as we walked along. mmmm. They were reported quickly my our friendly local police officer (also in the group!)